Monday, September 29, 2008
Favorite plants - Sweet Autumn Clematis
This vine does not resemble the large flowering clematis that bloom in the late spring and early summer. Sweet autumn is a large vine, easily reaching 20-feet, usually more. The flowers are small, but there are hundreds. To me the real difference lies in the fragrance; sweet and strong it can fill the yard on a warm evening.
SAC is especially lovely n the twilight when each bloom shimmers like a tiny star amongst the dark leaves.
My father's SAC grows up some light wires, covers his field stone chimney, and spills onto the roof. SAC twines so there is no damage to walls and bricks like there is with ivy.
A great choice to soften the hard lines of buildings and fences. It creates an informal look perfect for cottage and country gardens. SAC requires no maintenance other than the occasional tuck or tie to keep stems contained and an early spring cut back. I have never seen disease or insect damage on this vine.
Please do leave the SAC standing until early spring. Small birds love to shelter from the bitter weather in the dense foliage which clings all winger long.
Problems
Thursday, September 25, 2008
SkyWatch Friday - Plus an interesting garden shrub
I wanted to add some garden related stuff to the post. I have been procrastinating about this 'shrub' since Mary Lu first showed it to us in 2005. Next spring I am definitely going to order it. It's called Lespedeza thunbergii , or bush clover. There are several cultivars but I've decided on Pink Fountains. Lespedeza is a member of the pea family. It dies back almost to the ground after a hard freeze and regrows quickly every spring. They are hardy to zone 5 and very drought tolerant. Because they die back, it is usually recommended that underplanting with early spring bulbs is a good option. The lespedeza will fill in the bare areas left when the bulbs die back.
Please be sure to visit the link below to see some eye popping photos. The GardenWeb thread talks a little about the shrub, but halfway down are Mary Lu's photos. I love that graceful fountain shape, lovely even before bloom. I especailly love the fact that it is drought tolerant and needs little or no care or fertilizing. Pink Fountain is also supposed to be attractive to butterflies. It reminds me a little of the old fashioned spirea 'Bridle Wreath'.
Tuesday, September 23, 2008
Late Bloomers
Wednesday, September 17, 2008
Skywatch Friday sun rise through mist
Adding text to photos
The expensive photo editing programs do it best. The free program Serif Photo Plus 6 does it adequately. Sign your pictures, add some poetry, name the plants in the photo.
Position your cursor where you want the text to begin. Click on the ‘A’ on the left border, and a box appears. You can choose a font, a font size and then a color. Write your word or message in the box. Click OK.
Too small, not centered, color doesn’t stand out? Go to Edit > Undo and start again. If you are working with really big files, it is best to reduce the file size. If you don’t, you will never make the font large enough to show up.
Go online, find and download some unique fonts. That can make a lot of difference in the finial look of your photo.
It takes a little practice to make your editing perfect.
Sunday, September 14, 2008
If your photos don't look real...
We all want our photos to represent a true likeness of our gardens. We want to preserve and share flowers and foliage in all their varied hues and subtle shades. Digital cameras are wonderful tools, but they can produce results that are disappointing.
For example overexposure is too much light or light from a bad angle registering on the camera sensor. Colors look washed out, sometimes the foliage seem grayish and flowers are pale shadows of their true, vibrant selves. This is very frustrating because you see the colors before you are bright and beautiful but your camera is showing an image of colors that are anything but.
Underexposure is the opposite. Not enough light is coming thru the lens and your camera doesn’t see details. Colors are too dark and are not true. Objects are just silhouettes.
If you realize you’ve taken a bad photo, sometimes you can just snap another with better exposure, but not always. What if you are on a garden walk in the blazing sun? Many of your photos may be overexposed but you can’t really go back for a re-take.
Unless you are a professional photographer, bad photos happen. Even professionals, or I should say especially professionals, attempt to fix camera exposure problems and portray pictures as true to natural as possible. Adjusting the settings on your camera is a good place to start. Read the owners manual, it is the first best fix to get good pictures. The second best fix can come with a photo editing program.
Photography is a passion with me. I want to continue learning to take better pictures that I can enjoy and share. I have both Adobe Photo Shop and Paint Shop Pro. Photo Shop does an adequate job of fixing over and underexposures. If you have either of these or a favorite program, you know exactly what to do to make your pictures more true to life. If you don’t have a program, you can download Serif Photo Plus 6 for free. This is probably the best little editing program I’ve used for quick fixes. 1. It works with layers (which you may or may not ever use). 2. It does a good job with over and underexposure provided there is enough detail on the photo card to work with. A simple adjustment with two sliders can make washed out pictures regain their true vibrancy and the colors pop. 3. It allows you to add text to your pictures. Using text you can sign and date your work or add the botanical names of plants. 6. It crops if you want to enlarge a flower or eliminate a kid sticking out his tongue. 5. PP6 has a very simple cloning tool that can be used to remove power lines or other distracting details from photos.
First law of photo editing! Make a copy of your original and work with the copy only.
Second law when working with Serif Photo Plus! Save photos using 'Export'. To save your pictures go to File > Export and be sure the file type is .jpg. (You do not want to use File > Save As because PP6 saves as a file type that Blogger, Photobucket, Flickr, and many other programs cannot read.)
So if you are still reading, here is how to fix a washed out photo and make the natural, true to life color reappear. Photo Plus 6 shines in this department. IMHO, the best feature is the view as you edit. You are not looking at a tiny little pixilated editing screen like you do with most programs. The edits appear in real time with a full screen shot. Do not click OK until the picture looks like the real deal. Even after you click OK to correct the photo, you can go back to >Edit >Undo, and get back the original to start again. When you are done, remember to File > Export as a .jpg file.
Beckie from Dragonfly Corner took the first photo below of her beautiful red caladiums. She was disappointed when she downloaded the picture because her camera had washed out the vivid reds. Beckie thank you so much for allowing me to use your picture. These really are beautiful leaves, just a little overexposed.
All of us get frustrated if we can’t show a flower or object that looks real. I used PP6 and went to Image > Adjust > Brightness/Contrast. First I pulled the top slider Brightness to the left a little to darken and correct washed out colors. Then I moved the bottom contrast slider to the right to make the lost detail reappear. I didn’t have a red caladium so I adjusted from memory until the photo looked like caladiums I’ve seen in the past. Of course it’s easier to get exact colors if you have the plant sitting in your yard.
Same with this washed out, overexposed cottage. Trust me, the foliage was not really pale and gray. This cottage garden may have been past its prime in mid July but it never had the smoky haze this photo shows. The first photo is not true to life. The second is a much more realistic representation of how it appeared to the human eye.
I’m sorry, this is running on much longer than I intended. I will show the PP6 photo text feature, fixing underexposure, and the cloning feature in later postings.
.
Friday, September 12, 2008
Garden disappointments
I already mentioned how happy I am with my new purchase Volcano phlox. On the flip side, I've had a couple disappoints this season. The first was Gnus Flash. The photo on the left is the iris I thought I bought. The photo on the right is the iris I actually got. I bought it locally at one of our boutique garden centers. It wasn't blooming but I fell for the photo.
There is no way to prevent something like this and I'm not overly upset about it. I did do a double take when it first started to bloom. I thought, where in the world did that come from. Oh well, it isn't ugly, but it isn't Gnus Flash. I really wanted that dramatic black, white and tan bloom.
I know this happens when you buy from Walmart or Menards or HomeDepot. You don't usually pay a premium price at those box stores so it is easier to forgive them;) Box stores offer a guarantee too. The garden boutique guarantees the plant until the cashier grabs the money from your hand. Then you and the plant are on your own.
Another kind of disappointing plant was sea holly (eryngium). It was unusual and I loved it for about a week. See the photo below, it's gorgeous. Then it lost it's blue color and looked like a pasture thistle. I don't know if that's normal or if there was a disease problem. I bought it to dry for winter arrangements. It isn't stellar in that department. I'm going back out to find some wild teasil to dry instead.
Are any of you disappointed with some garden plants or garden related items this season? Maybe you didn't get what you wanted or something underperformed?
Wednesday, September 10, 2008
Tempest's Story
Dear Santa,
My name is Tempest, and Mom says I'm the naughtiest dog in the world, but I can explain.
When I was younger, I used to enjoy sitting on the warm hot tub cover and watching over the yard. Mom decided to shut down the hot tub in December, and then the cover was cold. Boy did that make me mad! When she went to work the next day, I tore the cover to bits. Mom attributed it to puppyhood. She waited two years to buy another cover and start up the tub again. I had my warm perch back! That December, Mom shut down the tub, and guess what? I tore it up. You'd think she'd learn.
Let's skip the mini blinds, the patio blinds, the smoked salmon, and the time I went after the electric saw that I thought was trying to attack our neighbor. I sneaked up from behind and tried to get the saw from between his legs. I don't know what I banged my head on, but he yelped like a litter of puppies!
A few months ago, after a boring breakfast of dog food, I got up on the kitchen counter for a box of donuts. I had to reach way up high into the cupboard above the stove. I didn't want the potato chips that were there, so I shoved them out of the way and they landed on the gas stove. I must have hit the burner knob on the stove when I jumped down with my box of donuts.
Turns out potato chips are flammable. I had already done some home remodeling on the cat door that Mom had installed when she got the cat. The door was supposed to allow the cat (but not me) to get to the litter box in the basement, but I had widened it prior to the fire. It was my carpentry skills and ingenuity that saved that cat and me when that stove started a fire We both escaped into the basement. So really, Santa, I should be treated as a hero for saving the cat's life!
In her letter to Santa, Tempest doesn’t mention that the family’s beloved lab was killed in the fire. Tempest must think Santa didn’t have that information.
As I drove home that evening, I thought about all the destruction and damage my Aggie has caused. I decided I’m very lucky by comparison.
Monday, September 8, 2008
Have some fun with your pictures, try Frame Fun
If you like pictures and you enjoy playing on the computer, you might enjoy Framefun v 2.0.0.7.
This program can enhance your photos, make them stand out, and create more of a professional effect. Of course you can create frames in Photoshop, but this program takes about one tenth the time and effort.
This is a very small, simple program that creates frames or borders for your photographs. Wide or narrow frames in a big selection of colors. It can mat your pictures too giving you a double border. By selecting the shadow option, you get a 3-d effect like a picture stuck on paper. You can write notes or titles on the mats for a professional look (you will need another program to write on photos). This is a quick and easy way to give your pictures just a little added style. And it's fun.
Here are a few examples:
First a screen shot of the program. Bottom left select frame, the color and the size. In the center you can check the border selection (like a mat inside the frame) and choose a color. You can try the vignette and the oval choices to see if you like those effects. If you want a shadow, you can do that too in several sizes and shades. Click apply. If you don't like the result, change the sizes, colors, etc and just click apply again.
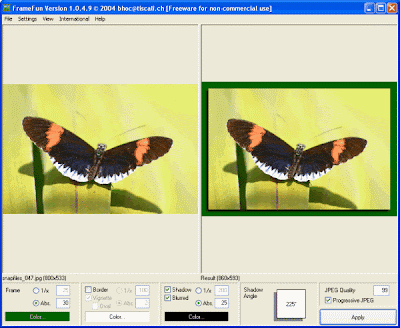
The program is fast and takes up very little space on your hard drive. It's also intuitive so there is no wasted time learning complicated procedures. Run a picture thru more than once and build on the number of borders. The best thing about Framefun, it's free.
Below is a simple black frame with a wider white border and shadow.
The same photo with an oval white frame.
I ran this photo thru twice. A white frame inside and then a green frame and white mat.
This one was run thru twice also.
I don't remember how I did the one below. It was more complicated involving at least to separate frame/border combinations with shadow.
The secrete is just to jump in and try different combinations until you like the results. Trial and error is the best way to learn. There is a little instruction with the program but I never read instructions;)
Going back over the photos I uploaded, I see I chose black and white almost exclusively. There are endless other colors so don't be misled by my lack of immagination.
If anyone is interested in free photo editing programs that can attach text to your photos let me know.
Thursday, September 4, 2008
SkyWatch - A misty sunrise over an Illinois field
Click the photo to enlarge.
I hope everyone has a wonderful weekend and gets to enjoy a spectacular sunrise.
Oh, by the way, check out Cielo's site House in the Roses. She is hosting a window party Monday September 8. If you have a window you like, email Cielo a photo (before the 8th) and she will post it on her 'Window Party' page. While you are visiting her site, be sure to click the garden door link. She has the cutest little animals waiting to welcome you and a fabulous garden of the month to tour.
Tuesday, September 2, 2008
Backyard birds
In the late summer, goldfinches begin nesting and raising their young. One of the reasons they wait until so late in the season is because they use thistle down to line their nests and they feed their babies thistle seed. If you provide an easily accessible Nyjer thistle feeder sock, it will bring goldfinches into your garden. When the young are learning to fly, the parents will bring them to the thistle sock and teach them to eat on their own. This is one of the most rewarding times to sit back and enjoy wild birds outside your window.
Two weeks ago I had one thistle sock hanging outside my dining room window. The birds would empty it every two or three days. Now I have three socks and there are 4 or 5 finches on each sock all day long. Hungry finches are a rowdy, noisy crowd and their squabbling, and constant movement is an endless source of interest for both me and the house cats.
Most of the finch group is this season’s fledglings. At first they sit on a branch and loudly demand “Feedme me, feedme, feedme”. After a few minutes of watching the older birds they jump down onto a sock and get the hang of pulling the tiny seed thru the holes.
Nyjer seed is irradiated so it will not sprout in your yard and produce a crop of thistles. The seed that falls on the ground is quickly eaten by doves and other birds.Tips for buying, feeding and storing Nyjer thistle seed: Because it is expensive, you don’t want to waste the stuff, so here is what works best for me. I by a quality brand, usually Kaytee. It isn’t the most expensive but all Kaytee brand seed is excellent quality. Wild Birds Unltd also has good seed as do many independent stores. Nyjer is usually packaged in socks for easy feeding and in vacuumed sealed bags to save a little money. The birds seem to prefer eating from socks. (I used to fill thistle tube feeders and ended up throwing away a lot of uneaten seed. For whatever reason, goldfinches in my area just don’t like the thistle tubes.) I buy several socks pre-filled with seed and when they are empty it’s easy to wash the sock and refill from a 3- or 7- pound bag. Be sure to store the opened bag in a big airtight ziplock. Nyjer gets stale after opening and the finches will often refuse it once they decide it has been opened too long.
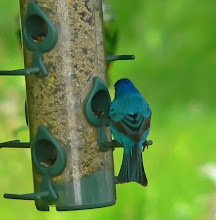
Many other bird varieties will also visit your sock to eat Nyjer including, purple finches, house finches, redpolls, indigo buntings, chickadees, and pine siskins.
And one other thing. A reminder to everyone who grows coneflowers, don’t be in a hurry to deadhead or tidy up the plants after bloom. Many native birds including finches, eat the seeds of this plant. Leave the dried stems standing until the birds have eaten the seed from the cones.